PITO Article
How Is Blue and White Porcelain Made: 7 Steps to Teach You
Welcome to the world of blue and white porcelain production! This millennia-old craft seamlessly blends raw material processing, shaping techniques, and artistic creation. As an experienced porcelain technician from Jingdezhen, I’ve compiled this guide to detail each step of blue and white porcelain production, covering operational essentials, practical tips, and important considerations. This handbook aims to help new artisans quickly get started, reduce errors, gain a deep understanding of the craftsmanship and cultural value of blue and white porcelain, and gradually develop their own style.
Step 1: Raw Material Preparation
The quality of PITO’s blue and white porcelain stems from premium raw materials. Kaolinite and China stone are the primary materials for making blue and white porcelain. Kaolinite is a fine, white clay that gives the fired porcelain its pristine white background and robust structure, while China stone (a feldspar-rich rock) provides translucency and a smooth glazed surface after firing. Jingdezhen’s kaolinite is renowned for its high purity; when selecting, be sure to check its whiteness and fineness to ensure minimal impurities. China stone should be broken to inspect its cross-section, to ensure it’s clean and free of sand or discoloration. Depending on the desired shape—for example, when making thin-bodied porcelain—the proportion of kaolinite needs to be increased, and quartz or clay can be added as appropriate to adjust the plasticity of the porcelain clay.
Raw material processing requires high precision. First, kaolinite and China stone are ground into fine powder using stone mills or mechanical grinders. The finer the particles, the more uniform the texture of the fired porcelain. This is followed by levigation, a process where the powder is mixed with water, allowed to settle, and the upper layer of impurities is removed. This process is repeated multiple times to ensure the purity of the slip. Incomplete levigation is a common cause of bubbles or cracks during firing. The processed raw materials are mixed in precise proportions (traditionally, the ratio of kaolinite to China stone is typically 6:4 or 7:3, with specific ratios adjusted based on clay properties and vessel shape), then stirred with water into a slip, and finally pressed through a filter cloth to form pliable porcelain clay. The porcelain clay isn’t immediately usable; it needs to be sealed and aged for at least two weeks to promote natural fermentation, thereby improving its plasticity and stability. The longer the aging period, the better the quality and plasticity of the porcelain clay typically become.
- When levigating, always use a fine mesh sieve to filter the slip, ensuring no coarse particles remain. This is a crucial step to prevent firing defects.
- When mixing the slip, control the force to avoid over-agitation, which can incorporate air into the slip and lead to bubbles that might burst during firing.
- Detailed records of different raw material proportions and their effects will help you optimize custom formulas for specific vessel shapes.
- Safety Tip: During grinding and levigating, wear a mask and gloves to avoid inhaling dust or prolonged skin contact with the slip, which can cause irritation.
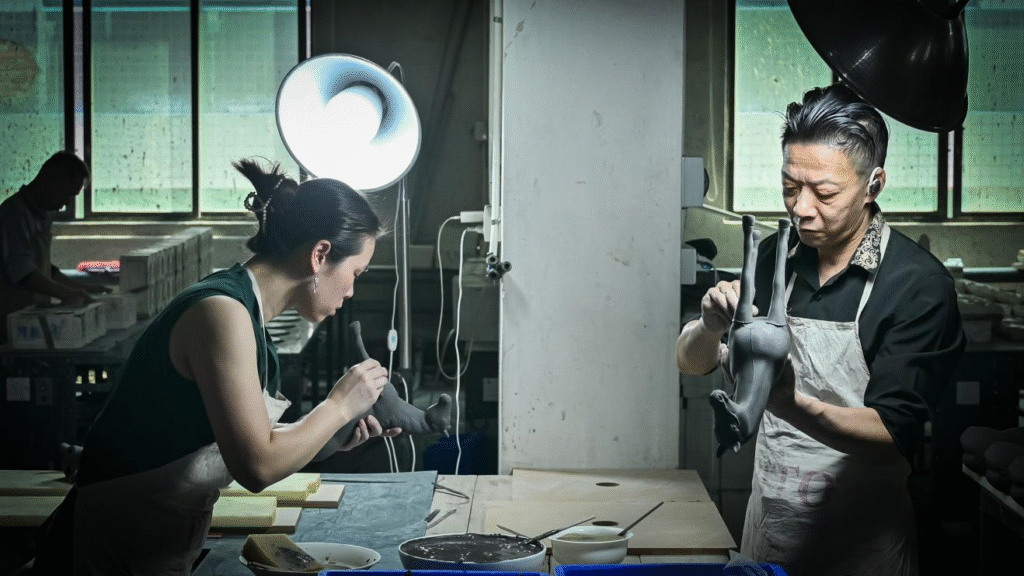
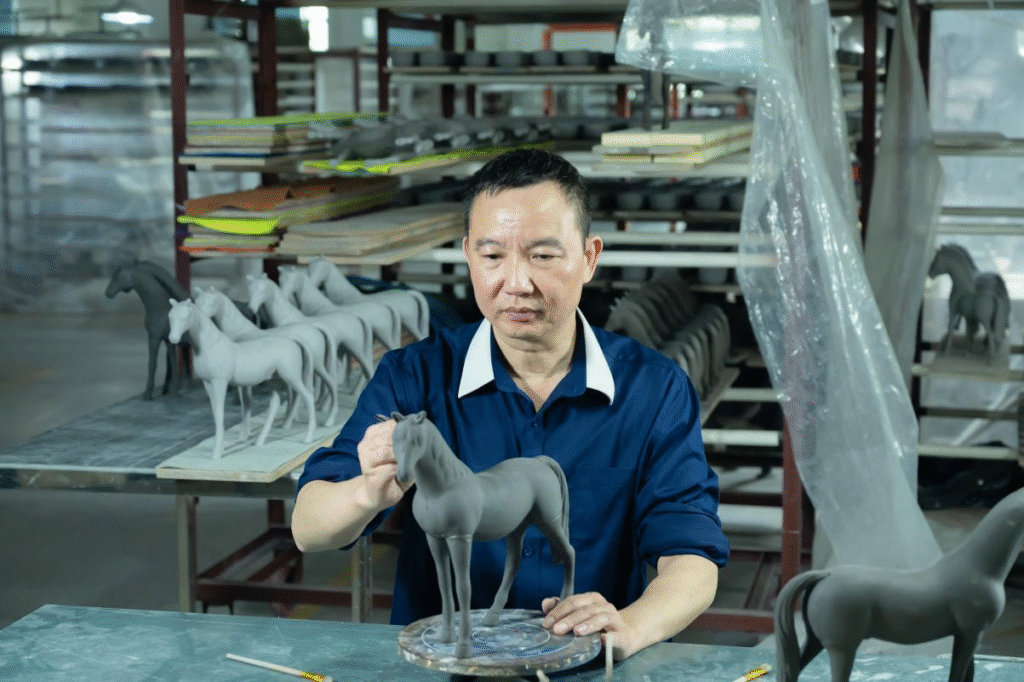
Step 2: Shaping
Shaping is the stage where porcelain clay is formed into specific vessel shapes, severely testing the artisan’s skill and concentration.
The most commonly used method is throwing, which utilizes the centrifugal force of a potter’s wheel to create symmetrical objects like bowls, plates, or vases. A suitable amount of porcelain clay is placed at the center of the potter’s wheel, and with both hands working together—one hand stabilizing the clay body and the other shaping it—the artisan sculpts the form. During throwing, keep hands wet to prevent sticking, and ensure the potter’s wheel speed is moderate, with continuous and fluid movements. For new artisans, mastering uniform wall thickness is a challenge; it’s recommended to start with simple bowls or cups, ensuring the base is slightly thicker to provide sufficient support.
For more complex or asymmetrical shapes, such as carved incense burners or irregularly shaped bottles, molding is often used. The porcelain clay is pressed evenly into a plaster mold, and once semi-dry, it’s carefully removed and trimmed. A small amount of oil should be applied to the inside of the mold beforehand to facilitate demolding. Slip casting is suitable for making thin-walled or mass-produced items. Liquid porcelain clay (i.e., slip) is poured into a plaster mold, left to stand for a period to allow the mold to absorb water, forming a uniform layer of clay; then the excess slip is poured out. During slip casting, the concentration of the slip must be precisely controlled to avoid it being too thin (which would result in fragile items) or too thick (which would make it difficult to flow).
After shaping, the porcelain body needs to be dried in a ventilated, cool place for 1–3 days, avoiding direct sunlight or rapid drying, as this can easily lead to cracking and deformation. During drying, a trimming knife can be used to carefully smooth the bottom of the body to prevent deformation during high-temperature firing. To slow down the rate of water evaporation, a damp cloth can be lightly draped over the body if necessary.
- The core of throwing is to ensure uniform wall thickness, especially a slightly thicker base, to enhance structural stability.
- Molds should be cleaned regularly, keeping their surface clean and smooth to ensure smooth demolding and a clean surface on the object.
- During drying, always regularly check the body; if tiny cracks are found, repair them promptly, otherwise, the cracks will enlarge during firing.
Step 3: Biscuit Firing
Biscuit firing is the process of initially hardening the porcelain body, laying a solid foundation for subsequent painting and glazing.
The dried porcelain body is carefully placed into the kiln. Biscuit firing temperatures are usually controlled at 800–900°C and last for 6–8 hours. Jingdezhen traditionally used wood-fired kilns where experienced kiln workers controlled the heat, while modern practice widely employs gas or electric kilns, which allow for more precise temperature control. The primary purpose of biscuit firing is to remove residual water from the body and enhance its hardness and absorbency, making it easier for blue and white pigments and glazes to adhere, and less prone to deformation. In the kiln, porcelain bodies need to be isolated with fire-resistant supports (such as saggars) to prevent them from sticking together during firing. Slow heating is crucial; rapid temperature changes are a major cause of body cracking.
After biscuit firing, the porcelain body is uniformly white and slightly rough on the surface, which is the ideal state for subsequent processes. At this point, each biscuit-fired piece must be carefully inspected for cracks, deformation, or other defects. Any tiny crack can be magnified in subsequent high-temperature firing, so new artisans must carefully observe and discard unqualified pieces.
- When placing porcelain bodies, ensure sufficient spacing between them to guarantee even heating and avoid defects caused by localized overheating or uneven heating.
- Recording firing times and temperatures is an important way to gain experience. After each biscuit firing, adjust parameters based on the results to continuously optimize the firing curve.
- When inspecting biscuit-fired pieces, don’t just visually check; gently caress the surface to check for unevenness or abnormalities, and even gently tap them to listen to their sound and judge if they are well vitrified.
Step 4: Blue and White Painting
The unique charm of blue and white porcelain comes from its blue and white patterns, and painting is undoubtedly the most critical and artistic part.
Blue and white pigment primarily uses cobalt oxide. Jingdezhen traditionally used imported cobalt materials, such as the Persian “Sumali Blue” commonly used in the Yuan Dynasty, which has a deep color and often shows purplish-brown spots after firing, creating a rust-spot effect, and Zhejiang “Pingdeng Green” commonly used in the Ming and Qing Dynasties, which has a soft and stable hue. Cobalt oxide needs to be ground into extremely fine powder, then mixed with water or a small amount of vegetable gum to form a pigment. The pigment’s concentration must be moderate to ensure smooth painting and good color development after firing. New artisans can try painting small samples on biscuit-fired pieces and observe the color development after firing to become familiar with color performance at different concentrations.
Painting tools mainly use brushes, with fine wolf hair brushes suitable for outlining patterns and medium-sized brushes for filling. Traditional blue and white porcelain patterns are extremely rich, including lotus scrolls, dragons and clouds, landscapes, flowers and birds, and narrative scenes. For new artisans, it’s recommended to start practicing with simple patterns (such as petals, cloud patterns, or geometric designs) and gradually master brushwork. Before formal painting, a sketch can be made with charcoal pencil or very dilute blue and white pigment for easier modification and adjustment. Outlining requires fluent and strong lines, while filling needs attention to shade transitions to create rich layering. The “fenshui” technique (i.e., using water to render a variety of shades from a single blue pigment by adjusting its concentration, akin to “five colors from ink”) is the essence of blue and white porcelain painting and requires repeated practice to master its subtleties. It’s especially important to note that blue and white pigment appears grey-black before firing and only turns into a vibrant blue after firing. New artisans need to adapt to this color difference and imagine the final effect.
- When painting, always keep your hand steady, apply appropriate pressure, and aim for a single stroke without smudging.
- Ensure a dust-free painting environment, as any tiny dust particles can adhere to the body, affecting the clarity of the pattern and the smoothness of the glaze.
- Avoid repeatedly applying blue and white pigment to the same area, as this can lead to uneven color blocks, or even pigment build-up and uneven glaze surfaces after firing.
Step 5: Glazing
Glazing is a crucial process that provides a smooth, translucent surface for blue and white porcelain. It not only beautifies the porcelain but, more importantly, protects the blue and white patterns from wear and makes their colors more vibrant.
Glaze is formulated from various mineral raw materials, such as china stone, plant ash, and limestone, in specific proportions. Transparent glaze, which produces a glassy texture after firing, is commonly used for Jingdezhen blue and white porcelain to maximize the appeal of the blue and white patterns. The glaze needs to be ground into extremely fine powder, then mixed with water to form a viscous glaze slip. The consistency of the glaze slip is critical and can be tested by dipping a finger into it; the optimal thickness is usually 0.5–1 millimeter.
Common glazing methods include:
- Dipping: Quickly immersing the biscuit-fired piece into the glaze slip, suitable for small and regularly shaped items like bowls and cups. This method requires quick and even operation.
- Brushing: Using a large brush to evenly apply the glaze slip onto the surface of the object, suitable for complex or large porcelain pieces, allowing better control over glaze thickness.
- Spraying: Using a spray gun to atomize and spray the glaze slip onto the object’s surface, suitable for mass production or achieving an extremely uniform glaze layer.
Before glazing, the porcelain body surface must be meticulously cleaned to ensure no dust, oil, or fingerprints are present, as these can lead to imperfections in the glaze. For areas with blue and white patterns, the glaze layer should be relatively thin to avoid obscuring pattern details or causing glaze runs during firing. After glazing, the glaze layer should be carefully inspected for bubbles, missed spots, or runs, and repaired promptly.
- Controlling glaze thickness is the core of glazing. Too thin a glaze will expose the body (“bare body”), affecting aesthetics and protection. Too thick a glaze is prone to glaze runs during firing, leading to uneven glaze surfaces or sticking to the kiln shelf.
- When dipping, the action should be swift and decisive, ensuring a uniform glaze layer in one application.
- Observe and learn from experienced artisans’ glazing techniques and skills; this is an effective way to master even application of glaze slip.
Step 6: High-Temperature Firing
High-temperature firing is the most critical and challenging step in blue and white porcelain production. It fuses the porcelain body, blue and white pigment, and glaze in intense heat, giving the porcelain its final life and brilliance. The success or failure of firing directly determines the quality of the work.
Firing usually takes place in wood-fired kilns or modern gas/electric kilns. Porcelain bodies need to be loaded into saggars to prevent them from sticking together or being contaminated by soot during firing. The firing process can be divided into three main stages:
- Slow Heating (0-600°C): The kiln temperature slowly rises, primarily to completely remove residual structural water from the porcelain body and prevent cracking due to rapid water evaporation.
- High-Temperature Sintering and Color Development (1,200–1,400°C): The kiln temperature rapidly increases to between 1,200–1,400°C and is maintained for 8–12 hours. This stage is crucial, and a reducing atmosphere (i.e., low-oxygen environment) is required in the kiln. In a reducing atmosphere, the cobalt oxide in the blue and white pigment can be reduced to cobaltous oxide, displaying a vibrant, pure blue color. Simultaneously, the porcelain body and glaze fully sinter at this high temperature, forming a dense porcelain body and a glassy glaze surface.
- Soaking and Slow Cooling: After high-temperature sintering is complete, the kiln will undergo several hours of soaking to stabilize the internal structure of the porcelain, then begin slow cooling. The cooling rate must be strictly controlled, as rapid cooling can lead to cracking (kiln cracks) or fine lines in the glaze (crazing).
The placement of porcelain bodies must be scientific and reasonable, usually with fire-resistant stilts at the bottom to ensure uniform heating of the porcelain base and to prevent it from sticking to kiln furniture. Experienced kiln workers will judge whether the reducing atmosphere is appropriate by observing the color of the flame inside the kiln (pale blue-white is preferred). For new artisans, mastering kiln temperature control requires long-term practice and learning, as even minor temperature fluctuations can cause porcelain deformation, glaze defects, or incorrect blue and white coloration. After firing, carefully check for bubbles (commonly known as “fire scars“), cracks (commonly known as “kiln cracks“), or other firing defects. Record the data and results of each firing, analyzing success and failure reasons to improve the process.
- Be sure to record detailed kiln temperature curves and firing data (e.g., time and temperature for heating, soaking, and cooling stages); these detailed records are invaluable resources for optimizing your future firing plans.
- Ensure reasonable spacing when placing porcelain bodies and maintain good ventilation in the kiln for even heat distribution.
- Observe changes in the kiln flame frequently to gain experience in controlling the fire; this is key to mastering the reducing atmosphere.
Step 7: Final Inspection and Finishing
After firing and cooling, the blue and white porcelain needs a meticulous final inspection to ensure it meets the highest quality standards.
In bright, ample light, carefully observe the glaze surface for smoothness, clarity, and absence of bubbles, glaze runs, bare spots, or specks. Check the blue and white patterns for clarity, fluidity, and uniform, vibrant color, without blurring or areas of poor color development. Gently tap the porcelain; high-quality porcelain will produce a crisp, pleasant sound, while pieces with cracks or poor vitrification will sound dull. Check if the shape is upright and if there is any deformation or signs of sticking to kiln furniture during firing. Any porcelain with obvious cracks, severe deformation, or glaze defects should be discarded or downgraded.
Finally, carefully sand down any burrs or unevenness that may exist on the bottom of the porcelain with fine sandpaper or an abrasive tool, ensuring it sits steadily and won’t scratch surfaces. For storage, wrap the porcelain in soft cloth or specialized packaging material to prevent scratches or bumps.
- Gently caress the glaze surface, using your fingertips to feel for perfect smoothness and check for any imperceptible bumps or flaws.
- After each inspection, record the causes of any problems. For example, uneven glaze might be due to uneven application, while dull blue and white color could be related to insufficient reducing atmosphere.
- Analyze unqualified pieces and summarize issues encountered during firing or production. This is crucial for subsequent process improvement.
Advice for New Artisans
Blue and white porcelain making is an art that requires long-term practice and persistent effort. Throwing and painting are two core skills that demand significant time for repeated practice to gradually master techniques and develop a unique personal style.
Delve deeply into classic patterns and shapes of Ming and Qing blue and white porcelain, understanding their underlying cultural connotations, aesthetic appeal, and characteristics of their respective eras. This will not only enhance your artistic appreciation but also provide endless inspiration for your creations. After each firing, be sure to meticulously record glaze formulas, blue and white pigment concentrations, kiln temperature curves, and the reasons for success or failure. These detailed records are vital tools for improving your skills and avoiding repeated mistakes.
Don’t be afraid of failure. Blue and white porcelain production has a long cycle and a relatively high failure rate, but every failure is a valuable learning opportunity. Humbly seek advice from experienced masters; their guidance can help you avoid detours and progress faster. Maintain patience and perseverance, and you will find that every successful piece embodies your sweat and wisdom, and witnesses your progress.
Blue and white porcelain is not just an object; it is a treasure of Chinese culture, carrying profound historical and artistic value. As a blue and white porcelain artisan, you bear the responsibility of respecting tradition and inheriting classic patterns, while also daring to integrate modern aesthetics and attempting innovation without losing the elegance and purity of blue and white porcelain.
Finally, be sure to pay attention to environmental protection. During the production process, properly dispose of waste clay and glaze to reduce environmental pollution and fulfill your social responsibility as an artisan.
I hope this manual will open up a wonderful journey into blue and white porcelain making for you! From the initial raw materials to the final product, every step contains exquisite craftsmanship and unique artistic beauty. May you, through unremitting practice and exploration, eventually become a skilled and uniquely creative blue and white porcelain artisan!
LET'S TALK TOGETHER
Lorem ipsum dolor sit amet, consectetur estor adipi isicing elit, sed do eiusmod tempor este uterre incididui unt ut